
Below are a couple of methods to capture a screenshot on Microsoft Windows.
Using keyboard shortcuts
- Press Shift + Win + S combination altogether until the Capture interface buttons appear.
Then drag with the mouse to capture a rectangular region and place it temporarily into the clipboard memory.
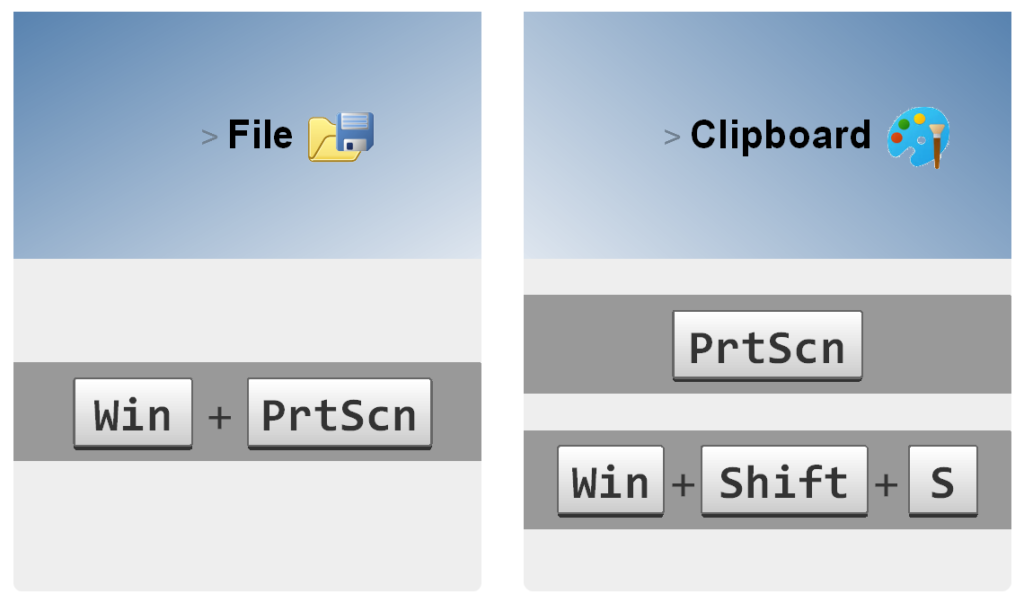
- Press PrtScn key to capture the entire screen (this will capture one image across multiple monitors if you have more than one monitor).
- Press Alt + PrtScn keys together to capture the currently active window to the clipboard.
Note: all the methods above, will capture the image temporarily in the Clipboard. You still need to paste the image into a program such as Paint, another image editing program, or Microsoft Office apps.
You can use to Ctrl + V paste the image content.
- Press Win + PrtScn simultaneously to take a screenshot of the entire screen and save the image automatically to the default “Screenshots” folder. Usually located under:
"C:\Users\<yourusername>\Pictures\Screenshots\"
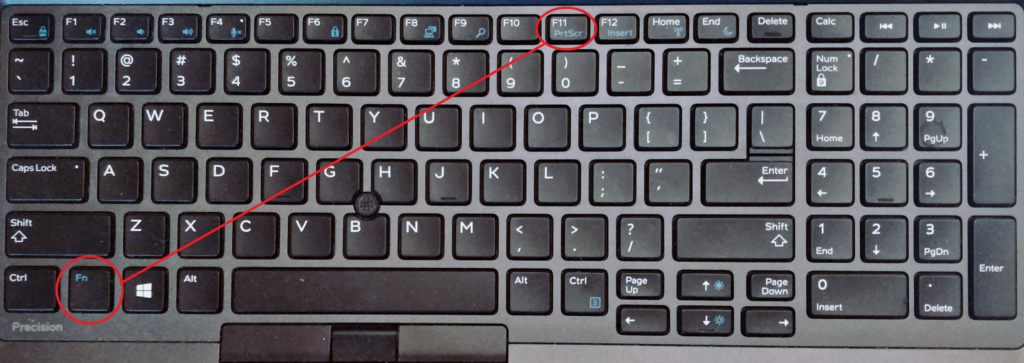
Note: most laptop keyboards place the Print-Screen button as a secondary function on top of one of the “F”-function keys.
This example has it on top of F11.
In this case, you need to press the combination: Fn + F11 keys just to get the Printscreen-key pressed:
Using Windows Snipping Tool
You can launch the Snipping Tool application from the Start menu.
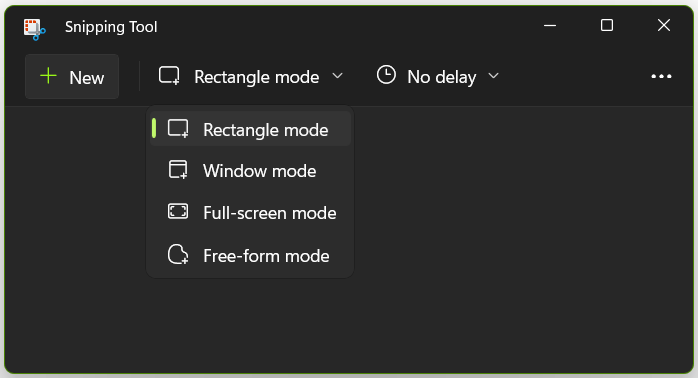
Click the “New” icon to capture a new screenshot.
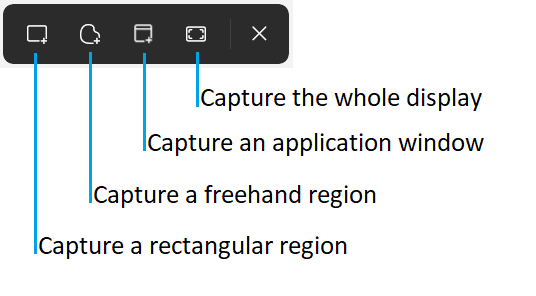
From the mode menu, you can switch between snipping a rectangular region, a free-form region, an app window, or Full-screen.
The Delay menu will add a delay of a couple of seconds between clicking the “New” icon, and actually starting the capture.
Note: the difference between using the keyboard shortcut combination: Shift + Win + S while the Snipping Tool is open to when it is not opened is that the latter will only copy the captured image to the clipboard but will not show you the result until you paste it into a program. But if Snipping Tool is opened, then the captured image will be directly placed inside its window and only require you to save it as a file.
Summary
Using Third-Party Apps
There are many third-party applications that can help capturing the screen for you. Some of them might provide more tools to capture video as well. But a notable screenshot capturing program is: Greenshot.
Greenshot is free for private use, and allows for automatically saving the captured image, and including the mouse cursor in the capture if needed.
This web site is my intake, really good style and perfect subject material.